
Working with Unreal Engine can be a complex yet rewarding experience for game developers. Streamlining your development process is key to maintaining productivity and creativity. One effective way to achieve this is by leveraging live templates in Rider and CLion. These powerful tools can automate repetitive tasks, reduce errors, and significantly speed up your workflow.
In this post, we’ll explore some of the most useful live templates that I use for Unreal Engine development and in general, and how to set them up in Rider and CLion to enhance your coding efficiency.
What are Live Templates?
Live templates are predefined code snippets that can be quickly inserted into your code by typing a short abbreviation and pressing a designated key combination. They help automate repetitive coding tasks, enforce coding standards, and reduce the chance of errors. In the context of Rider and CLion, live templates can be customized to suit your specific needs, making your development process more efficient and streamlined.
And here is a base example of a live template in Rider:
Setting Up Live Templates in Rider and CLion
First you need to go to Rider/Clion settings File | Settings and then navigate to Editor | Live Templates. Here you can see all the available live templates and create new ones.
Many live templates are already available out of the box, but you can also create your own custom templates. To create a new live template, click the + button and select the desired context in which the template should be available (e.g., C++, Unreal Engine, etc.). You can then define the abbreviation, description, and template text. You can also specify variables that will be replaced with actual values when the template is expanded.
For example, you can create a live template for a simple UE_LOG statement in C++:
- Click the + button to create a new live template.
- Choose option
Live Template. - Set the abbreviation to
uelogorulogas you wish. - Set the description (optional).
- Put into
Template textthe following code snippet:1
UE_LOG($LOG_CATEGORY$, $LOG_VERBOSITY$, TEXT("Actor: '%s', Debug info $TYPE$"), *GetName(), $END$);
- At the bottom you can see
Definesection where you can define variables. Click and chooseOther. - Click the button
Save.
So by typing uelog and pressing Tab you will get the following code snippet, and caret will be placed at the variable $END$.
We need to add additional variables to the template to make it more useful. For example, we can add variables for the log category and verbosity level, we can achieve this by adding the following variables to the template:
- Click the button
Edit variables. - For the row
LOG_CATEGORYset expression toenum("LogTemp", "LogClass"), default variableLogTemp. - For the row
LOG_VERBOSITYset expression toenum("Warning", "Error", "Fatal", "Display", "All"), default variableWarning. - For the row
TYPEset expression toenum("%s", "%f", "%d", "empty"), default variable%s. - Click the buttons
OKandSave.
You can add more items toenum()variables to the template and modify the text message to make it even more flexible.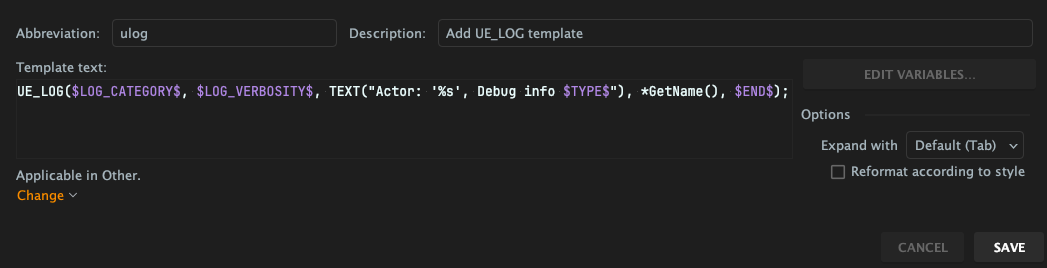

Adding UPROPERTY() snippet
By using the previous steps you can create a live template for UPROPERTY() macro. Here is an example of how you can set it up:
- Create a new live template with the name
uproporupropertyas you wish. - Add this to the
Template text:1
2
3UPROPERTY($FIRST$, $SECOND$, Category = "Category|Sub-category",
Meta = (DisplayName = "Custom Name", EditConditionHides, EditCondition = "bCustomBoolVar"))
$END$ - Add variables:
FIRSTwith expressionenum("EditAnywhere", "VisibleAnywhere", "EditDefaultsOnly", "VisibleDefaultsOnly", "EditInstanceOnly", "VisibleInstanceOnly"), default variableEditAnywhere.SECONDwith expressionenum("BlueprintReadOnly", "BlueprintReadWrite", "EditFixedSize", "EditInline"), default variableBlueprintReadWrite.
Adding UENUM() snippet
- Create a new live template with the name
uenum. - Add this to the
Template text:1
2
3
4UENUM(BlueprintType)
enum class E$END$ : uint8 {
First UMETA(DisplayName = "First")
};
Adding UFUNCTION() snippet
- Create a new live template with the name
ufuncorufunctionas you wish. - Add this to the
Template text:1
2UFUNCTION($FIRST$, Category = "Category")
void $END$(); - Add variable:
FIRSTwith expressionenum("BlueprintCallable", "BlueprintPure", "BlueprintImplementableEvent", "BlueprintNativeEvent"), default variableBlueprintCallable.
Adding general useful todo message
- Create a new live template with the name
todo. - Add this to the
Template text:1
2//TODO author: $USER$, date: $DATE$ $TIME$, attention: $PRIORITY$
// - $END$ - Add variable:
USERwith expressionuser().DATEwith expressiondate().TIMEwith expressiontime().PRIORITYwith expressionenum("Fix", "Feature", "Warning", "Possible error"), default variableFix.
Conclusion
Incorporating live templates into your Unreal Engine development workflow using Rider and CLion can significantly enhance your productivity and code quality. These predefined snippets automate repetitive tasks, enforce coding standards, and reduce the likelihood of errors, ultimately streamlining your development process. By customizing live templates to fit your specific needs, you can save valuable time and focus more on the creative aspects of game development.
From setting up basic snippets like UE_LOG() statements to more complex macros like UPROPERTY(), UENUM(), and UFUNCTION(), the examples provided demonstrate the flexibility and power of live templates. Additionally, the ability to create personalized TODO messages ensures that your code documentation remains consistent and informative.
Adopting these practices will not only improve your efficiency but also contribute to a more organized and maintainable codebase. By leveraging the full potential of live templates, you can optimize your workflow and make the most out of your development tools.